HDHomeRun HD3-4DC and Linux (Yousee and Stofa)

A buddy of mine bought 2 HDHomeRun HD3-4DC and wanted to use this on a Ubuntu 12.04 Server
the problem with Ubuntu 12.04 is that the DVB kernel headers was removed from the normal header packages.

first make sure that your network has a working DHCP server, and that the HDhomeRun is connected to the network and that the antenna cable is connected.

first we need to add the ppa repository from
https://launchpad.net/~tfylliv/+archive/dvbhdhomerun

Adding the PPA repository:

$ add-apt-repository ppa:tfylliv/dvbhdhomerun
$ apt-get update

Kernel driver:
Next we need the kernel headers and the missing headers:
i my case the server was using the following kernel, linux-image-3.8.0-39-generic
the missing DVB headers i grapped from Kernel.org

# apt-get install linux-headers-3.8.0-39-generic
$ wget https://www.kernel.org/pub/linux/kernel/v3.x/linux-3.8.tar.gz

Unpack the headers:

$ tar zxfv linux-3.8.tar.gz

Next copy the missing headers to the Ubuntu headers:

$ cp -R /linux-3.8/drivers/media/dvb-core/* /usr/src/linux-headers-3.8.0-39/drivers/media/dvb-core/
$ cp -R /linux-3.8/drivers/media/dvb-frontends/* /usr/src/linux-headers-3.8.0-39/drivers/media/dvb-frontends/

Installing the hdhomerun dkms and utils:

$ apt-get install dvbhdhomerun-dkms dvbhdhomerun-utils

This should build the dvb_hdhomerun kernel driver and the userhdhomerun userspace and the necessary script to run the userspace service,

try initialize the kernel driver:

$ modprobe dvb_hdhomerun

this should give something like this when looking at dmesg

[   17.893873] HDHomeRun: Begin init, version 0.0.16
[   17.897220] HDHomeRun: Waiting for userspace to connect
[   17.897228] HDHomeRun: End init

Setup Tuners:

We need to locate the names of the tuner in my case we actually have 2 of them :).

$ hdhomerun_config discover
hdhomerun device 141001A7 found at 192.168.1.136
hdhomerun device 14101464 found at 192.168.1.130

make a note of the name of the tuners i my case they are named: 141001A7 and 14101464.
next edit /etc/dvbhdhomerun

$ nano /etc/dvbhdhomerun

my config file looks like this:

# Remember to exchange the XXXXYYYY-Z with the serial number of your HDHomeRun
# tuner:

# Auto detect tuner type is not possible in all cases, so you can force it
# DVB-C
# DVB-T
# ATSC

[141001A7-0]
tuner_type=DVB-C

[141001A7-1]
tuner_type=DVB-C

[141001A7-2]
tuner_type=DVB-C

[141001A7-3]
tuner_type=DVB-C

[14101464-0]
tuner_type=DVB-C

[14101464-1]
tuner_type=DVB-C

[14101464-2]
tuner_type=DVB-C

[14101464-3]
tuner_type=DVB-C

# You can use a full name including tuner ID. Meaning the tuner will appear as
# "HDHomeRun DVB-C 1234EA3D-0" instead of just "HDHomeRun DVB-C" in for example
# TVHeadend.

[141001A7-0]
use_full_name=true

[141001A7-1]
use_full_name=true

[141001A7-2]
use_full_name=true

[141001A7-3]
use_full_name=true


[14101464-0]
use_full_name=true

[14101464-1]
use_full_name=true

[14101464-2]
use_full_name=true

[14101464-3]
use_full_name=true


# You can disable certain tuners. As default all detected hdhomeruns are used

#[XXXXYYYY-2]
#disable=true


# Enable additional logging  from libhdhomerun itself
[libhdhomerun]
enable=true
enable=true
logfile=/var/log/dvbhdhomerun_libhdhomerun.log

Now restart the dvbhdhomerun-utils

$ service dvbhdhomerun-utils restart

dmesg should show something like this:

[   19.050534] hdhomerun: userhdhomerun connected
[   19.050574] hdhomerun: userhdhomerun connected
[   19.050588] hdhomerun: creating dvb device for 141001A7-0
[   19.050688] DVB: registering new adapter (HDHomeRun)
[   19.110568] HDHomeRun HDHomeRun.0: DVB: registering adapter 0 frontend 0 (HDHomeRun DVB-C 141001A7-0)...
[   19.110685] HDHomeRun0: DVB Frontend registered
[   19.110688] HDHomeRun0: Registered DVB adapter0
[   19.110728] hdhomerun: device /dev/hdhomerun_data0 created
[   19.110971] hdhomerun: userhdhomerun connected
[   19.110984] hdhomerun: creating dvb device for 141001A7-1
[   19.111065] DVB: registering new adapter (HDHomeRun)
[   19.112681] HDHomeRun HDHomeRun.1: DVB: registering adapter 1 frontend 0 (HDHomeRun DVB-C 141001A7-1)...
[   19.112722] HDHomeRun1: DVB Frontend registered
[   19.112724] HDHomeRun1: Registered DVB adapter1
[   19.112762] hdhomerun: device /dev/hdhomerun_data1 created
[   19.112959] hdhomerun: userhdhomerun connected
[   19.112969] hdhomerun: creating dvb device for 141001A7-2
[   19.113058] DVB: registering new adapter (HDHomeRun)
[   19.115142] HDHomeRun HDHomeRun.2: DVB: registering adapter 2 frontend 0 (HDHomeRun DVB-C 141001A7-2)...
[   19.115221] HDHomeRun2: DVB Frontend registered
[   19.115223] HDHomeRun2: Registered DVB adapter2
[   19.115264] hdhomerun: device /dev/hdhomerun_data2 created
[   19.115456] hdhomerun: userhdhomerun connected
[   19.115467] hdhomerun: creating dvb device for 141001A7-3
[   19.115558] DVB: registering new adapter (HDHomeRun)
[   19.115904] HDHomeRun HDHomeRun.3: DVB: registering adapter 3 frontend 0 (HDHomeRun DVB-C 141001A7-3)...
[   19.115951] HDHomeRun3: DVB Frontend registered
[   19.115953] HDHomeRun3: Registered DVB adapter3
[   19.115985] hdhomerun: device /dev/hdhomerun_data3 created

The hdhomerun is now connected.

Scanning for DVB-C channels:
As i live in Denmark, the most common DVB-C providers are Yousee and Stofa

for Yousee use the following setup:

$ hdhomerun_config XXXXXXXX set /sys/dvbc_modulation a8qam64-6875

for Stofa use the following setup:

$ hdhomerun_config XXXXXXXX set /sys/dvbc_modulation a8qam64-6900

Next we need to setup the tuners:

$ hdhomerun_config  XXXXXXXX set /tuner0/channelmap eu-cable
$ hdhomerun_config  XXXXXXXX set /tuner1/channelmap eu-cable
$ hdhomerun_config  XXXXXXXX set /tuner2/channelmap eu-cable
$ hdhomerun_config  XXXXXXXX set /tuner3/channelmap eu-cable

finally we can scan the muxes for channels:

$ hdhomerun_config XXXXXXXX scan 0 hdhomerun.log

the scan takes some time so be patience

if you are going to install TVheadend you should do the following to the log file:

For Yousee:

awk '{if ($1 ~ /SCANNING/) print "\n" $2; else print $0}' hdhomerun.log | awk 'BEGIN { RS = "" ; FS = "\n" } { if (length($4) > 0) print "C " $1 " 6875000 NONE QAM64" }' > dk-YouSee

For Stofa:

awk '{if ($1 ~ /SCANNING/) print "\n" $2; else print $0}' hdhomerun.log | awk 'BEGIN { RS = "" ; FS = "\n" } { if (length($4) > 0) print "C " $1 " 6875000 NONE QAM64" }' > dk-Stofa

the generated file is readable by TVheadend and should make it more easy to find the channels.

Notes:

If you wanne update the firmware for the hdhomerun you can do this with the hdhomerun_config tool by doing:
(check Silicondust’s homepage for newer releases)

$ wget http://download.silicondust.com/hdhomerun/hdhomerun3_dvbc_firmware_20140121.bin
$ hdhomerun_config 14101464 upgrade hdhomerun3_dvbc_firmware_20140121.bin

References:

http://tommy.winther.nu/wordpress/2013/06/21/opsaetning-af-hdhomerun-dual/
https://launchpad.net/~tfylliv/+archive/dvbhdhomerun
http://sourceforge.net/apps/trac/dvbhdhomerun/wiki/FAQ#RebuildkernelmodulesinUbuntu
http://sourceforge.net/apps/trac/dvbhdhomerun/wiki/UbuntuPackages
 

Installing Apache::Gallery

This is a step by step guide for installing Apache::Gallery (libapache-gallery-perl) on Debian, this will possible also work for Ubuntu.

The system i did the installation on was a Debian 7 (Wheezy).

First lets install the basic packages:
first install Apache 2:

aptitude install apache2

Now for perl:

aptitude install libapache2-mod-perl2

now for Image::Imlib2:

aptitude install libimage-imlib2-perl

Finaly install Apache:Gallery:

aptitude install libapache-gallery-perl

now make the apache config for the new gallery site, in my case i addet a virtual host to my apache config:

i choose to use the /var/www/gallery as the place for my photos, feel free to use any other place.

Now for the apache config, this is straight forward, if in trouble look at this link: debian-administration.org

<VirtualHost *:80>
        ServerName   testserver01.some.com
        DocumentRoot /var/www/gallery/  #<----- make sure this directory is readable by www-data
        ErrorLog     /var/log/gallery-error_log
        TransferLog  /var/log/gallery-access_log
        PerlSetVar   GalleryTemplateDir '/usr/share/libapache-gallery-perl/templates/default'
        PerlSetVar   GalleryInfo 'Camera => Model, Picture Taken => DateTimeOriginal, Flash => Flash, ShutterSpeed => ShutterSpe$
        PerlSetVar   GallerySizes '640 1024 1600 2272'
        PerlSetVar   GalleryThumbnailSize '100x75'
        <Location />
            SetHandler  perl-script
            PerlHandler Apache::Gallery
        </Location>
</VirtualHost>

restart apache with:

/etc/init.d/apache2 restart

Apache:gallery will properly generate a error looking something like this (look at /var/log/gallery-error_log):

unable to writhe to /var/cache/www/testserver01.some.com

make the directory and make sure www-data have writing access.

Now for the gallery.css file.
Place gallery.css in the gallery root directory (in this example /var/www/gallery)

use this code for the css style:

body {
    background-color: #cccccc;
    font-family: Verdana, Lucida, Arial;
    font-size: 10px;
    margin-left: 10px;
    margin-top: 10px;
    text-align: center;
}
td {
    font-size: 10px;
}
table {
    margin-left: auto;
    margin-right: auto;
}
#menu {
    font-size: 11px;
    text-align: left;
    height: 30px;
}
#nav {
    font-size: 11px;
    text-align: left;
    height: 30px;
    text-align: right;
}
#directory {
    background-color: #ffffff;
    border: 1px solid #666666;
    padding: 20px;
    text-align: left;
    top: 0px;
}
#folder {
    float: left;
    height: 100px;
    padding: 2px;
    text-align: center;
    width: 120px;
}
#picture img {
    border: 1px solid #000000;
}
a {
    color: #5555aa;
}
a img {
    border: 2px solid #5555aa;
}
a:hover {
    color: #ff9400;
}
a:hover img {
    border: 2px solid #ff9400;
}
#folder img {
    border: 0px;
}
.info {
    background-color: #eeeeee;
    border: 1px dashed #888888;
    color: #666666;
    font-size: 10px;
    margin: 10px;
    padding: 5px;
}

make the following directory /usr/share/apache2/icons/gallery and copy the icons from /usr/share/libapache-gallery-perl/icons to the new directory

restart Apache.

there you have it there should be a working gallery now 🙂

remember to add some photos to the new gallery

more info can be found at http://apachegallery.dk/


Updating Debian squeeze to wheezy

Find word squeeze and replace with wheezy. At the end it should look as follows:

 
deb http://mirrors.kernel.org/debian/ wheezy main
deb-src http://mirrors.kernel.org/debian/ wheezy main

deb http://security.debian.org/ wheezy/updates main
deb-src http://security.debian.org/ wheezy/updates main

# wheezy-updates, previously known as 'volatile'
deb http://mirrors.kernel.org/debian/ wheezy-updates main
deb-src http://mirrors.kernel.org/debian/ wheezy-updates main

To update the package list, enter:

# apt-get update

do a update of the base system, enter:

# apt-get upgrade

Now upgrade the rest of the system, enter:

# apt-get dist-upgrade

Reboot the system:

you can verify your debian version by entering:

$ lsb_release -a

the output should look something like this:

No LSB modules are available.
Distributor ID:	Debian
Description:	Debian GNU/Linux 7.0 (wheezy)
Release:	7.0
Codename:	wheezy

Configuring Samba to be a WINS server

This is quite easy to do, and it makes browsing the smb network fast.

Configuring the server:
simply edit smb.conf (typically located at /etc/samba/smb.conf)
locate the the wins support and enable it.:

# Windows Internet Name Serving Support Section:
# WINS Support - Tells the NMBD component of Samba to enable it's WINS Server
wins support = yes

setup the way samba should resolve the hosts:

# What naming service and in what order should we use to resolve host names
# to IP addresses
#   name resolve order = lmhosts host wins bcast
   name resolve order = host wins bcast

The following option should be addet to the linux DHCP server (if you use linux as a DHCP server):

option netbios-name-servers x.x.x.x;

where x.x.x.x is the IP of the WINS server

If you use a normal router, sometimes they support pushing out the wins server, if you use a router running dd-wrt
go tothe  basic setup and add the WINS server IP, there.

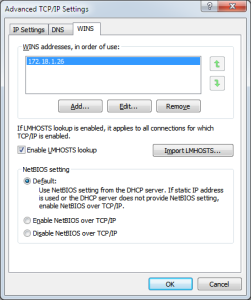
If this fails you can add the WINS server manually to windows:
go to the control panel, and press the View network status and tasks, then press the change adapter setting
right click the network interface and select properties, select the TCP/IP (for windows 7 select TCP/IPv4)
and press properties again click advanced and select the WINS  and add the IP of the WINS server and you are ready to go

WINS_server_win7

For linux clients simply edit the smb.conf and add the following:

# WINS Server - Tells the NMBD components of Samba to be a WINS Client
# Note: Samba can be either a WINS Server, or a WINS Client, but NOT both
   wins server = x.x.x.x

replace x.x.x.x with the IP of the WINS server

Happy smb surfing 🙂

The philosophy of naming computers

I always liked the idea of having a naming scheme for naming computers, from the days when i worked at the university they gave servers, names after planets like Uranus and Neptune, when i later started setting up computers at home i went on with my own naming scheme i selected the Norse mythology, later on i started using the different elements for machines outside my network. i seen people using many different naming schemes like, movie stars, diary products.

it gives the machines something personal meaning and it’s funny when people ask why they are named the way they are, no matter what, it’s a good ice breaker :).

Even the laptop I’m using for writing this post is named Njord :).

Here’s a list of possible naming schemes that i like:

if you want more possible naming schemes take a look at namingschemes.com there should be a scheme for everybody :).

Happy naming.


The Remote DVD player project.

What to do when you just get the urge to watch a DVD movie?
well over time i discarded alle my DVD players and went on using Popcorn Hour A110/WD TV Live Media players

I discovered the project called DVDReadFS The project enables a machine to read a DVD and remove the macro vision on the fly,

first i installed the following packages:
libdvdcss, fuse and the fuse-devel packages

then followed the guide at DVDReadFS for compiling DVDReadFS, i ended up making a permanent mount point in /etc/fstab

dvdreadfs#/dev/hdd /mnt/dvd1 fuse ro,kernel_cache,allow_other 0 0

I then shared the mount point in samba. Now the only thing i need to do when i wanna watch a DVD movie is to  drop a DVD in the drive and open the share on my media player

i will post some more installation details when i will me making my small networked DVD player, using a VIA C7 and a old DVD drive built into a discarded Cambridge CD audio case that i will modify, to fit the PC and drive.

to be updated!.


Solving the: No interfaces problem with Wireshark in Ubuntu/Lubuntu

Run the following in the Terminal:

Code:
sudo addgroup -quiet -system wireshark
sudo chown root:wireshark /usr/bin/dumpcap
sudo setcap cap_net_raw,cap_net_admin=eip /usr/bin/dumpcap

Then run the following changing YOUR_USER_NAME onto your user name:

Code:
sudo usermod -a -G wireshark YOUR_USER_NAME

That’s it. No need to restart or even log off. Just start Wireshark and select the network interface.

PXE Booting The Soekris NET4501 and Net4801

Well had a Soekris NET4801 for a longtime initially i build the image on a old machine that i discarded for many years ago, i did a quick search on the net for some interesting links about PXE booting the Soekris
i Found the following sites of interest:

Used this guide for the basic setup of the DHCP and TFTP Server and Config of the PXElinux.conf:
Setup ad DHCP and a PXE Boot server

if you need a little more reading this page will give som ideas to:
Install Ubuntu over PXE netboot (headless using serial terminal) on a Soekris Net4801

The NET4801 is not that fast and it will take some time to install the system, my system is only based on a compact flash card.