This is a small shell script that will reveal what shell commands that you use the most:
history|awk '{print $2}'|awk 'BEGIN {FS="|"} {print $1}'|sort|uniq -c|sort -rn|head -10
Think about that…..
This is a small shell script that will reveal what shell commands that you use the most:
history|awk '{print $2}'|awk 'BEGIN {FS="|"} {print $1}'|sort|uniq -c|sort -rn|head -10
Think about that…..
This is a step by step guide for installing Apache::Gallery (libapache-gallery-perl) on Debian, this will possible also work for Ubuntu.
The system i did the installation on was a Debian 7 (Wheezy).
First lets install the basic packages:
first install Apache 2:
aptitude install apache2
Now for perl:
aptitude install libapache2-mod-perl2
now for Image::Imlib2:
aptitude install libimage-imlib2-perl
Finaly install Apache:Gallery:
aptitude install libapache-gallery-perl
now make the apache config for the new gallery site, in my case i addet a virtual host to my apache config:
i choose to use the /var/www/gallery as the place for my photos, feel free to use any other place.
Now for the apache config, this is straight forward, if in trouble look at this link: debian-administration.org
<VirtualHost *:80>
        ServerName   testserver01.some.com
        DocumentRoot /var/www/gallery/  #<----- make sure this directory is readable by www-data
        ErrorLog     /var/log/gallery-error_log
        TransferLog  /var/log/gallery-access_log
        PerlSetVar   GalleryTemplateDir '/usr/share/libapache-gallery-perl/templates/default'
        PerlSetVar   GalleryInfo 'Camera => Model, Picture Taken => DateTimeOriginal, Flash => Flash, ShutterSpeed => ShutterSpe$
        PerlSetVar   GallerySizes '640 1024 1600 2272'
        PerlSetVar   GalleryThumbnailSize '100x75'
        <Location />
            SetHandler  perl-script
            PerlHandler Apache::Gallery
        </Location>
</VirtualHost>
restart apache with:
/etc/init.d/apache2 restart
Apache:gallery will properly generate a error looking something like this (look at /var/log/gallery-error_log):
unable to writhe to /var/cache/www/testserver01.some.com
make the directory and make sure www-data have writing access.
Now for the gallery.css file.
Place gallery.css in the gallery root directory (in this example /var/www/gallery)
use this code for the css style:
body {
    background-color: #cccccc;
    font-family: Verdana, Lucida, Arial;
    font-size: 10px;
    margin-left: 10px;
    margin-top: 10px;
    text-align: center;
}
td {
    font-size: 10px;
}
table {
    margin-left: auto;
    margin-right: auto;
}
#menu {
    font-size: 11px;
    text-align: left;
    height: 30px;
}
#nav {
    font-size: 11px;
    text-align: left;
    height: 30px;
    text-align: right;
}
#directory {
    background-color: #ffffff;
    border: 1px solid #666666;
    padding: 20px;
    text-align: left;
    top: 0px;
}
#folder {
    float: left;
    height: 100px;
    padding: 2px;
    text-align: center;
    width: 120px;
}
#picture img {
    border: 1px solid #000000;
}
a {
    color: #5555aa;
}
a img {
    border: 2px solid #5555aa;
}
a:hover {
    color: #ff9400;
}
a:hover img {
    border: 2px solid #ff9400;
}
#folder img {
    border: 0px;
}
.info {
    background-color: #eeeeee;
    border: 1px dashed #888888;
    color: #666666;
    font-size: 10px;
    margin: 10px;
    padding: 5px;
}
make the following directory /usr/share/apache2/icons/gallery and copy the icons from /usr/share/libapache-gallery-perl/icons to the new directory
restart Apache.
there you have it there should be a working gallery now 🙂
remember to add some photos to the new gallery
more info can be found at http://apachegallery.dk/
Find word squeeze and replace with wheezy. At the end it should look as follows:
deb http://mirrors.kernel.org/debian/ wheezy main
deb-src http://mirrors.kernel.org/debian/ wheezy main

deb http://security.debian.org/ wheezy/updates main
deb-src http://security.debian.org/ wheezy/updates main

# wheezy-updates, previously known as 'volatile'
deb http://mirrors.kernel.org/debian/ wheezy-updates main
deb-src http://mirrors.kernel.org/debian/ wheezy-updates main
To update the package list, enter:
# apt-get update
do a update of the base system, enter:
# apt-get upgrade
Now upgrade the rest of the system, enter:
# apt-get dist-upgrade
Reboot the system:
you can verify your debian version by entering:
$ lsb_release -a
the output should look something like this:
No LSB modules are available.
Distributor ID:	Debian
Description:	Debian GNU/Linux 7.0 (wheezy)
Release:	7.0
Codename:	wheezy
This is quite easy to do, and it makes browsing the smb network fast.
Configuring the server:
simply edit smb.conf (typically located at /etc/samba/smb.conf)
locate the the wins support and enable it.:
# Windows Internet Name Serving Support Section:
# WINS Support - Tells the NMBD component of Samba to enable it's WINS Server
wins support = yes
setup the way samba should resolve the hosts:
# What naming service and in what order should we use to resolve host names
# to IP addresses
#   name resolve order = lmhosts host wins bcast
   name resolve order = host wins bcast
The following option should be addet to the linux DHCP server (if you use linux as a DHCP server):
option netbios-name-servers x.x.x.x;
where x.x.x.x is the IP of the WINS server
If you use a normal router, sometimes they support pushing out the wins server, if you use a router running dd-wrt
go tothe basic setup and add the WINS server IP, there.
If this fails you can add the WINS server manually to windows:
go to the control panel, and press the View network status and tasks, then press the change adapter setting
right click the network interface and select properties, select the TCP/IP (for windows 7 select TCP/IPv4)
and press properties again click advanced and select the WINS and add the IP of the WINS server and you are ready to go

For linux clients simply edit the smb.conf and add the following:
# WINS Server - Tells the NMBD components of Samba to be a WINS Client
# Note: Samba can be either a WINS Server, or a WINS Client, but NOT both
   wins server = x.x.x.x
replace x.x.x.x with the IP of the WINS server
Happy smb surfing 🙂
Well the place where i do some voluntary work, had this Samsung CLX-3175FW Color Laser printer for some years now and the unit i starting to show to following warning: “replace imaging unit soon” from the old days doing repairs on different printers at the university, i found that a lot of manufacturers place small fuses, software counters that are supposed to make the user replace different parts in the printers normally these parts are quite expensive, some of these “errors” can sometimes be reset without that much work, and the this was one of them.
What you needs is the following:
A Solderings iron
A 56Ω 0,25watts resistor
Let’s get to work.First thing is to take all the color cartridges out of the printer and place them somewhere safe (be sure not to drop the color powder on anything)
next thing is to remove the wast toner box in the left side, now remove the imaging unit.

you should se 2 cobber contacts in the right side of the imaging unit, this small device can be removed from the unit.
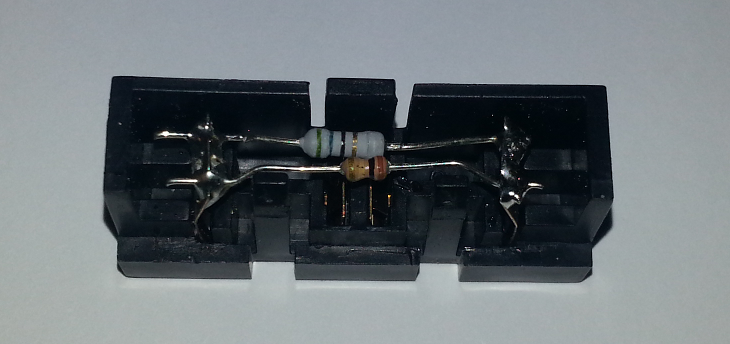
inside the unit that i took apart, there where 2 resistors, the small one, is actual just a “sense” function that makes the printer aware if the unit is not installed, in my case the resisitor was a 140KΩ, the larger resistor was a 56Ω but this resistor was burned and did no longer function. So this resistor functions as a “new” device put into the printer, the printer then burns this resistor to reset the imaging unit counter.
a quick trip to the storage with a new 56Ω resistor, i removed the old one and soldered the new inside the unit, i used a 1% resistor as this was the only type that i had.
i then put the unit back into the imaging unit, and cleaned the unit for any excess toner, and dust.
then i put everything back into the printer and powered the unit on.
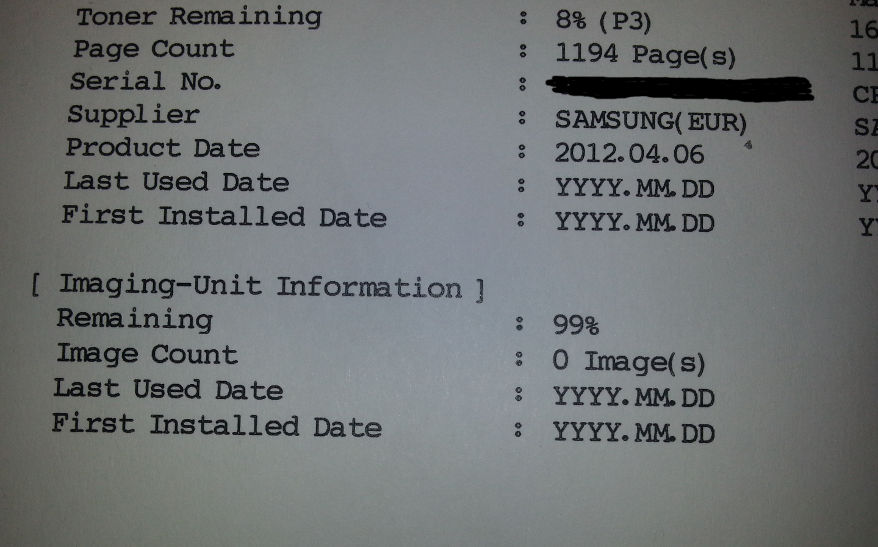
i printed a report for the unit and wolia 🙂 the printer now thinks the imaging unit is new.
i den took the unit apart again and checked the resistor, somehow the printer didn’t burn i properly so i remove the resistor , just to be sure that i didn’t break anything, maybe the original samsung placed resistor is easer to burn?, but hey what the heck it did the job.
This fix/hack cost around 0.50DKR, and a new imaging unit cost around 900-1100DKR so witch one do you chose?.
I always liked the idea of having a naming scheme for naming computers, from the days when i worked at the university they gave servers, names after planets like Uranus and Neptune, when i later started setting up computers at home i went on with my own naming scheme i selected the Norse mythology, later on i started using the different elements for machines outside my network. i seen people using many different naming schemes like, movie stars, diary products.
it gives the machines something personal meaning and it’s funny when people ask why they are named the way they are, no matter what, it’s a good ice breaker :).
Even the laptop I’m using for writing this post is named Njord :).
Here’s a list of possible naming schemes that i like:
if you want more possible naming schemes take a look at namingschemes.com there should be a scheme for everybody :).
Happy naming.
What to do when you just get the urge to watch a DVD movie?
well over time i discarded alle my DVD players and went on using Popcorn Hour A110/WD TV Live Media players
I discovered the project called DVDReadFS The project enables a machine to read a DVD and remove the macro vision on the fly,
first i installed the following packages:
libdvdcss, fuse and the fuse-devel packages
then followed the guide at DVDReadFS for compiling DVDReadFS, i ended up making a permanent mount point in /etc/fstab
dvdreadfs#/dev/hdd /mnt/dvd1 fuse ro,kernel_cache,allow_other 0 0
I then shared the mount point in samba. Now the only thing i need to do when i wanna watch a DVD movie is to drop a DVD in the drive and open the share on my media player
i will post some more installation details when i will me making my small networked DVD player, using a VIA C7 and a old DVD drive built into a discarded Cambridge CD audio case that i will modify, to fit the PC and drive.
to be updated!.
Quick and Dirty, when needing to update files and subdirectories
find . -exec touch {} \;
Run the following in the Terminal:
sudo addgroup -quiet -system wireshark
sudo chown root:wireshark /usr/bin/dumpcap
sudo setcap cap_net_raw,cap_net_admin=eip /usr/bin/dumpcap
Then run the following changing YOUR_USER_NAME onto your user name:
sudo usermod -a -G wireshark YOUR_USER_NAME
That’s it. No need to restart or even log off. Just start Wireshark and select the network interface.
To add the toolbar back, you’ll want to right-click on an open area of the taskbar, and choose Toolbars \ New Toolbar from the menu. You should probably also unlock the taskbar at this point.
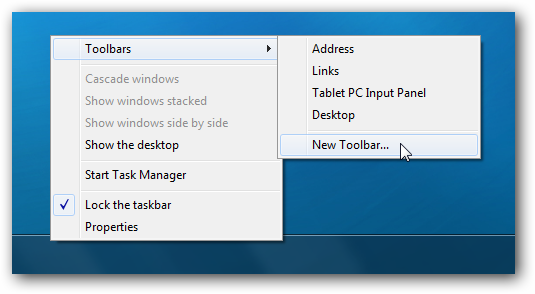
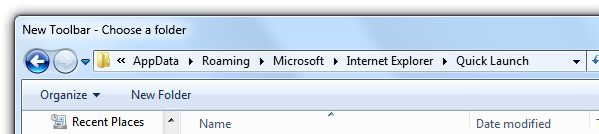
Now’s the slightly tricky part… you’ll want to paste the following path into the location bar:
%appdata%\Microsoft\Internet Explorer\Quick Launch
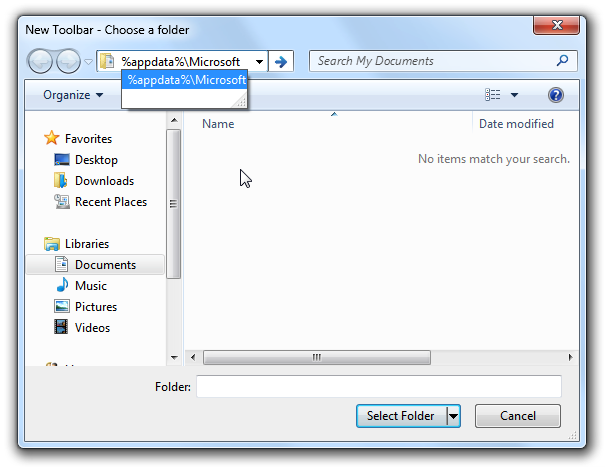
Make sure that the location bar shows the full path, like the next screenshot, before you choose the “Select Folder” button.
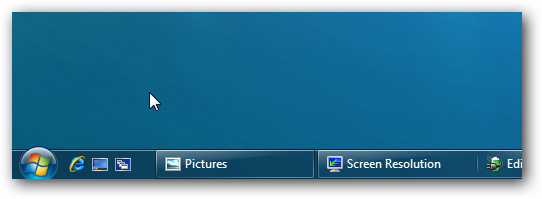
You’ll immediately notice the Quick Launch toolbar on the taskbar, but it’s all the way over on the right, so you’ll want to click on the dotted lines and then drag the toolbar all the way to the left (which is slightly tricky sometimes). Note that you’ll need to right-click and unlock the taskbar before you can move the toolbar.
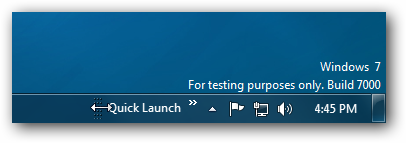
There we go, it’s over on the left… but now you’ll want to adjust the regular taskbar toolbar to be closer to the left, so use the dotted lines to drag it over as well.
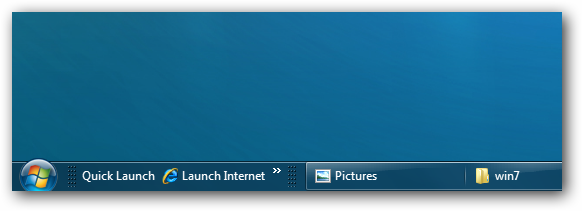
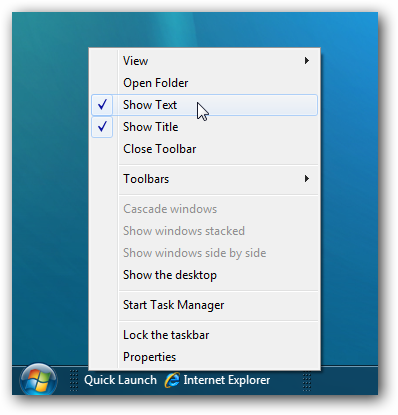
The normal Quick Launch that we’re used to doesn’t have text, so right-click on the dotted lines and uncheck “Show Text” as well as “Show Title” from the menu.
Once you’re sure it’s the way you want it, you should check the “Lock the taskbar” again.
And there you are, the quick launch bar has returned and there’s virtually no way anybody would know this is Windows 7.